Best Practices for Installing a Pneumatic Ball Valve
Content Menu
● Understanding Pneumatic Ball Valves
● Preparation for Installation
● Installation Environment Considerations
● Step-by-Step Installation Guide
>> 2. Inspect Valve and Actuator Alignment
>> 3. Install the Valve in Correct Flow Direction
>> 4. Gasket and Seal Application
>> 7. Actuator Setup and Testing
● Maintenance Tips Post-Installation
● FAQ
>> 1. How do I verify the correct valve size for my application?
>> 2. Can pneumatic ball valves be installed in any orientation?
>> 3. What air quality is required for the pneumatic actuator?
>> 4. How often should pneumatic ball valves be maintained?
>> 5. What are common causes of pneumatic ball valve failure?
Pneumatic ball valves are essential components widely used in critical applications such as oil and natural gas production, seawater desalination, and offshore drilling platforms. These valves offer reliable flow control with the added advantage of pneumatic actuation for automation and remote operation. Proper installation ensures operational safety, extended service life, and optimal performance. This article details the step-by-step best practices for installing a pneumatic ball valve, providing guidance for OEM manufacturers, exporters, and end users across international markets.
Understanding Pneumatic Ball Valves
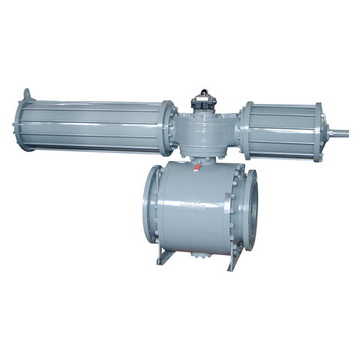
A pneumatic ball valve integrates a rotary ball valve mechanism with a pneumatic actuator, which uses compressed air to open or close the valve. The ball inside the valve body rotates 90 degrees to control the flow, offering tight shutoff and minimal pressure drop. Pneumatic actuation enables quick and precise control, making these valves ideal for automated process lines.
Preparation for Installation
Before installation, verify the valve specifications to match flow requirements, pressure rating, temperature conditions, and media compatibility. Inspect the valve and actuator for any transit damage, contamination, or defects. Ensure all necessary tools and materials are at hand, including gaskets, mounting brackets, lubricants, and sealants approved for the application.
Installation Environment Considerations
Select a clean and dry installation site free from excessive vibration, dust, or corrosive elements. Ensure accessibility for maintenance and operation. Consider pipe alignment and support to avoid undue stress or strain on the valve body and actuator. Proper grounding and protection of the actuator against environmental factors such as weather or extreme temperatures should be planned.
Step-by-Step Installation Guide
1. Pipeline Preparation
Flush the pipeline to remove debris, welding residues, or contaminants that could damage the valve seats or ball surface. Temporary caps or plugs protect the valve ports while pipe ends are prepared.
2. Inspect Valve and Actuator Alignment
Confirm the actuator mounting position matches the valve's mounting pad. The actuator shaft and valve stem should align perfectly to avoid misoperation or premature wear.
3. Install the Valve in Correct Flow Direction
Most pneumatic ball valves can be installed bidirectionally; however, always verify the specific valve design and follow manufacturer instructions. Some designs have flow direction markings to ensure proper sealing and actuator function.
4. Gasket and Seal Application
Use compatible gaskets between flanges or threaded connections. Use lubricants sparingly to facilitate installation but avoid contamination of sealing surfaces with grease or oil unless specified by the manufacturer.
5. Mounting and Tightening
Align the valve with connecting pipes and tighten flange bolts evenly in a crisscross pattern to the recommended torque to avoid distortion. For threaded valves, tighten to specifications avoiding overtightening to prevent thread damage.
6. Pneumatic Connection
Install clean air supply lines with appropriate filters and regulators to protect the actuator. Connect pneumatic tubing according to the actuator's control ports for proper open/close commands. Check for leaks with soapy water or leak detection solutions.
7. Actuator Setup and Testing
Adjust actuator settings—such as positioners, limit switches, and feedback devices—according to process control requirements. Cycle the valve open and closed manually or via signal to ensure smooth operation without binding or hesitation.
8. Final Inspection
Verify all fasteners, connections, and seals. Ensure valve handle or actuator position indicator aligns with valve status (open or closed). Review pneumatic system pressure and actuator response.
Maintenance Tips Post-Installation
Regular inspection and maintenance extend the lifespan of pneumatic ball valves. Periodically check for air leaks, actuator calibration, and valve seat integrity. Lubricate moving parts as recommended by the manufacturer. Replace worn seals or gaskets promptly to avoid media leakage.
Use correct cleaning methods—avoid harsh chemicals that can degrade valve components. For valves used in critical services like seawater or petroleum, maintain strict records of maintenance activities and performance testing.
Conclusion
Correct installation of pneumatic ball valves is vital to maximizing their functionality and longevity in demanding industrial environments. Adhering to manufacturer guidelines, preparing the installation site properly, and performing careful alignment and sealing will prevent common operational issues such as leaks, premature wear, and actuator failure. With proper maintenance, pneumatic ball valves provide reliable automated flow control to support efficient and safe production processes.
If your operations require high-quality pneumatic ball valves tailored to sectors such as upstream to downstream oil and gas, seawater desalination, or offshore drilling, our factory specializes in designing and manufacturing durable valves with OEM customization. Contact us to discuss your specific technical requirements and discover how our valves can enhance your system performance.
FAQ
1. How do I verify the correct valve size for my application?
Check the flow rate, pressure, media type, and pipe size specifications against the valve's rated parameters in the product datasheet to ensure compatibility.
2. Can pneumatic ball valves be installed in any orientation?
Generally, yes, but confirm with the manufacturer as some designs may have preferred orientations to optimize actuator performance or drainage.
3. What air quality is required for the pneumatic actuator?
Clean, dry, and filtered compressed air free of oil and particulates is essential to prevent actuator malfunction and corrosion.
4. How often should pneumatic ball valves be maintained?
Maintenance intervals depend on the application but typically include quarterly inspections and annual comprehensive servicing for demanding environments.
5. What are common causes of pneumatic ball valve failure?
Misalignment during installation, poor air supply quality, lack of lubrication, excessive torque on connections, and exposure to contaminants are frequent causes.
Hot tags: Pneumatic Ball Valve Installation Guide, How To Install Pneumatic Ball Valves, Best Practices For Valve Installation, Industrial Valve Installation Tips, Pneumatic Actuator Setup Instructions, Proper Ball Valve Mounting Techniques, Common Installation Mistakes To Avoid, Step By Step Pneumatic Valve Installation, Maintenance After Valve Installation, Ensuring Leak Free Pneumatic Ball Valve Setup